Free Audio Recorder is a full-fledged program for capturing sound from various sources (sound card, microphone, Internet radio, etc.).
Everyone knows that with the help of modern software, even not the most experienced computer users can work with various multimedia files, including audio ones.
When the required audio recording is already on the hard drive, then using editing programs it is possible to trim the track, remove unnecessary pieces or change the quality and format of the track.

But in some cases the user needs to create this entry himself, for example, capture sound from an external source and save the audio file in the desired format. Free Audio Recorder copes well with such tasks. The name of the program itself indicates that it can be downloaded for free, and its use does not require registration.
By installing the Free Audio Recorder program on your Windows computer, the user gets access to the function of capturing audio from a wide variety of sources.

During its operation, this audio recorder consumes a minimal amount of computer system resources, thereby having virtually no impact on its performance. After capturing the audio, the user will be given the opportunity to select the format in which he wants to save the final audio file. For example - MP3, OGG, or WAW.
In this article we will talk about how to record sound from a computer without a microphone. This method allows you to record audio from any sound sources: from players, radio and the Internet.
To record we will use the program Audacity, which can record sound in various formats and from any devices in the system.
1. Run the file downloaded from the official website audacity-win-2.1.2.exe, select the language, in the window that opens, click "Further".


2. We carefully read the license agreement.

3. Select the installation location.

4. Create an icon on the desktop, click "Further", in the next window click "Install".


5. When installation is complete, you will be prompted to read a warning.


6. Ready! Let's launch.

Record
Selecting a recording device
Before you start recording audio, you need to select the device from which you will capture. In our case it should be Stereo mixer(sometimes the device may be called Stereo Mix, Wave Out Mix or Mono Mix).
Select the desired device from the device selection drop-down menu.

If the Stereo mixer is not in the list, then go to the Windows sound settings,

Select the mixer and click "Turn on". If the device is not displayed, then you need to check the boxes, as shown in the screenshot.

Selecting the number of channels
There are two recording modes you can choose from: mono and stereo. If we know that the track being recorded has two channels, then choose stereo; in other cases, mono is quite suitable.

Record sound from the Internet or from another player
For example, let's try to record sound from a YouTube video.
Open a video and turn on play. Then go to Audacity and click "Record", and when recording is complete, press "Stop".
You can listen to the recorded sound by clicking on "Play".

Saving (exporting) a file


To export audio in MP3 format, you must additionally install an encoder plugin called Lame.
From time to time, users have a not very popular need - to record an audio track of what is currently playing on the PC. Quickly navigating and saving, for example, an important conversation on Skype, can be problematic if you have never encountered sound recording on a computer before and don’t know where and what to look for. Therefore, it is better to familiarize yourself with the capabilities of Windows in advance.
You can record important audio information in the following ways:
- if you have a stereo mixer: built-in sound recording program in Windows;
- without a stereo mixer: special programs for sound recording, for example, Audacity;
- using an audio cable;
- recording using online programs.
First of all, you need to activate the stereo mix. This device is usually disabled in settings. To enable it, you need to right-click on the speaker icon in the notification area and click on “Recording devices”.

If the stereo mixer does not appear in the list that appears, right-click in the empty field in this window and turn on the “Show disabled devices” mode. Next, we activate the stereo mixer by pressing the right button as usual, then confirm the default use.
It should be noted that for non-standard cards there may be another device instead of a standard stereo mixer. For example, the source of the recording "What U Hear" from Sonic Blaster.

It is worth noting that after turning on the stereo mixer, you can enjoy a nice bonus - through the Shazam application for Windows. It allows you to determine the name of the song being played by sound.
The easiest way to make a sound recording is to use the built-in program in Windows. To do this, in Win 7 and 8, go to the Start menu -> All Programs -> Accessories -> Sound Recorder. For Win 10 – Start -> Voice Recording.

The standard sound recording program is very unpretentious and very easy to use, it starts with the “Start Recording” button. After clicking the “Stop Recording” button, it will offer to save the file in wma format (this is a licensed format for working with audio streams from Microsoft) in the folder of your choice.

If you need a different sound format, you can use alternative recording programs, for example, AudioMaster, but you will have to download them. Using this program, you can edit previously made digital recordings in any format or record new ones.
Record audio from a computer without a stereo mixer
It happens that some sound cards do not have drivers for a stereo mixer or the manufacturer has blocked such a device. A good assistant in this case will be the Audacity program, which is also useful if you have a stereo mixer. The program has advanced capabilities compared to standard audio recording applications.

To record sound from a computer using this program, you need to select Windows WASAPI in the first drop-down list, or your sound card in the second (which serves as your sound source) and press the start button.
Recording using an audio cable
This method is a little exotic, but useful if the stereo mixer is not supported and there is no Internet. Consequently, there is no way to download a recording program or use an online service, but you still need to record an audio track. You will need a cable with a 3.5 connector on both ends.

You need to connect one of the plugs to the microphone jack, the second to the audio output (headphones). After this, you can open any available recording program, for example, built into Windows, and carry out the necessary actions.
Online services for recording
There are also sites that provide the ability to record audio without having to install additional applications on your computer. Here are the most popular ones:
- vocalremover.ru;
- online-voice-recorder.com;
- vocaroo.com;
- audio-joiner.com/ru/;
- sound-recorder.ru and many other sites and browser add-ons.

Let's look at the sound recording process using the first site as an example. It’s easy to do: click the “Start Recording” button, and after finishing, click the “Stop” button. You can listen to the result before downloading and re-record if the recording is unsuccessful. There are also several additional options: changing the tempo, key, format converter. The downloaded file will be in the most popular MP3 format.
Thus, there are many opportunities to make high-quality audio recordings on your PC with any equipment.
Video - How to record sound from a computer
It is one of the most popular external devices for a computer. Using a microphone, you can chat on the Internet, sing karaoke, or simply record sound. In this material we will consider just the last option. Here you will learn how to record sound through a microphone on a computer, how to save it, and what to do if the sound from the microphone is not recorded.
Record sound from a microphone using the Sound Recorder program
If you use the Windows 7 or Windows XP operating system, then you can record sound from a microphone through the standard Sound Recorder program. This program has almost no settings, but it is very easy to use. In general, it is suitable if you have little experience and want to get acquainted with recording sound through a microphone on a computer.
In Windows XP, the Sound Recorder program can be launched by going to Start - All Programs - Accessories - Entertainment - Sound Recorder. In Windows 7, the path to the program is slightly shorter than “Start - All Programs - Accessories - Sound Recorder”. In addition, in Windows 7 you can use the search. To do this, open the Start menu, enter the search query “Sound Recorder” and open the found program.
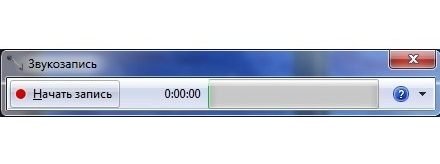
After you launch the Sound Recorder program, you can begin recording sound through a microphone to your computer. To do this, click on the “Start Recording” button and start speaking into the microphone. In this case, pay attention to the bar to the right of the “Start Recording” button. If the microphone is working, then green lines should appear in this strip, indicating the signal level from the microphone.
To stop recording audio, click on the “Stop Recording” button. After stopping recording, the program will offer to save the recorded audio in WMA format. In the future, the saved WMA file can be listened to using any audio playback program, for example, using Winamp.
It should be noted that the Sound Recorder program is no longer available in Windows 10. Instead, Windows 10 comes with a standard Voice Recorder program. You can launch Voice Recorder by finding it in the list of all programs or by searching in the Start menu.
Record audio from a microphone using Audacity
If you often need to record sound through a microphone on your computer, then standard programs like “Sound Recorder” or “Voice Recorder” will not be enough for you, since they have very limited capabilities. In your case, you need to resort to more professional programs to record sound.
For example, you can use the free audio editor Audacity to record audio. This editor allows you to record and edit audio in WAV, MP3 and OGG formats. It is possible to import and export audio files in OGG, FLAC, WAV, AU and AIFF formats. And if you install additional modules, you can also import audio files in MPEG, WMA, GSM, AC3 and AAC formats. Overall, Audacity offers a fairly wide range of features for a novice user.
In order to record sound using Audacity, go to the official website of the developer, download the installation file and install it on your computer. As already mentioned, the program is completely free, so there should be no problems with installation. Just click the “Next” button several times and the installation is complete.
After launching the program, you can immediately begin recording sound through a microphone to your computer. To do this, simply click on the button with the red dot.

After clicking this button, audio recording will begin. To stop it, click on the button with a yellow square.

Now you can proceed to saving. To do this, you need to open the “File” menu and select “Export Audio”, after which the sound recorded from the microphone can be saved in one of the formats supported by the program.
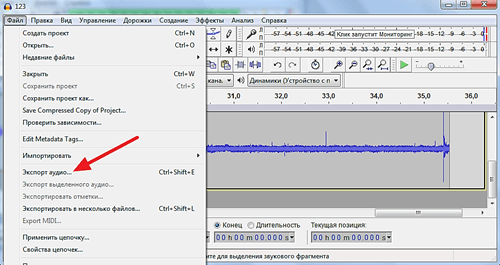
It should be noted that if you want to get an audio file ready for playback, then you need to use “Export Audio”. If you save in the usual way (using CTRL-S), the recorded audio will be saved in the Audacity program format.
What to do if sound is not recorded?
If the sound is not recorded, then most likely there is something wrong with your microphone or sound card. The most common causes of audio recording problems are:
- Sound card drivers are not installed;
- The microphone is turned off or incorrectly connected to the computer;
- Problems with ;
- Problems with connectors on the front panel of the computer;
You can read more about these problems in the article “”.
The SendPulse service is a marketing tool for creating a subscription base and converting casual visitors to your website into regular ones. SendPulse combines on one platform the most important functions for attracting and retaining customers:
● e-mail newsletters,
● web push,
● SMS mailings,
● SMTP,
● newsletters in Viber,
● sending messages to facebook messenger.
Email newsletters
You can use various tariffs for conducting e-mail mailings, including free ones. The free plan has restrictions: the subscription base is no more than 2500.The first thing you need to start with when working with the e-mail newsletter service is to create your own address book. Set a title and upload a list of email addresses.

It’s convenient to create on SendPulse subscription forms in the form of a pop-up window, built-in forms, floating and fixed in a certain part of the screen. Using subscription forms, you will collect a subscriber base from scratch or add new addresses to your base.
In the form designer, you can create exactly the subscription form that best meets your needs, and the service tips will help you cope with this task. It is also possible to use one of the available ready-made forms.

When creating subscription forms, be sure to use an email with a corporate domain. Read how.
Message templates will help you beautifully design your letters to subscribers. You can create your own letter template in a special designer.

Automatic mailings. Content managers actively use automatic mailing. This helps automate the process of working with clients. You can create an automail newsletter in several ways:
● Sequential series of letters. This is the simplest option when, regardless of the conditions, several letters are written that will be sent to recipients in a certain order. There may be options here - series of messages(simple message chain), special date(letters are timed to specific dates), trigger letter– the letter is sent depending on the subscriber’s actions (opening a message, etc.).
● Automation360– mailing with certain filters and conditions, as well as taking into account conversions.
● Ready-made chains according to the template. You can create a series of letters using a given template or modify the template and adjust it to your needs.
A/B testing will help you experiment with different options for sending a series of letters and determine the best option based on opens or clicks.
Sending Push Notifications
Push mailings are a subscription in a browser window, this is a kind of replacement for RSS subscriptions. Web-push technologies have rapidly entered our lives, and it is already difficult to find a website that does not use push mailings to attract and retain customers. Request script for , you can send letters either manually or create auto-mailings by creating a series of letters or collecting data from RSS. The second option implies that after a new article appears on your website, a notification about this will be automatically sent to your subscribers with a brief announcement.
New from SendPulse– now you can monetize your site using Push notifications by embedding advertisements in them. Upon reaching $10, payments are made every Monday to one of the payment systems - Visa/mastercard, PayPal or Webmoney.
Push messages on the service are absolutely free. Payment is taken only for White Label - mailings without mentioning the SendPulse service, but if the service logo does not bother you, then you can use push notifications for free without restrictions.


